Utilizando function calling nos assistentes Azure OpenAI

O Azure OpenAI é um serviço da Microsoft que integra modelos avançados de inteligência artificial, como o GPT-4o, em diversas aplicações. Ele oferece funcionalidades como geração de texto, tradução de idiomas, análise de sentimentos e resumo de textos, aprimorando a automação e eficiência de soluções empresariais. Neste tutorial, vamos configurar uma web API em .NET que utiliza o serviço Azure OpenAI com a funcionalidade de function calling.
O function calling da OpenAI é uma funcionalidade que permite a modelos de linguagem executarem funções específicas durante uma conversa. Em vez de apenas gerar texto, o modelo pode reconhecer quando uma ação ou operação é necessária e chamar uma função predefinida para realizar essa tarefa. Isso pode incluir consultar dados, executar cálculos, acessar APIs externas ou manipular informações de forma mais estruturada. A capacidade de chamar funções aumenta a utilidade prática dos modelos de linguagem, permitindo a integração com sistemas complexos e proporcionando respostas mais precisas e contextualizadas.
Vamos ao projeto! Começaremos criando uma pasta raiz para nossa solução.
mkdir AzureOpenAiFunctionCalling
Em seguida, vamos criar o arquivo .gitignore para nossa solução:
dotnet new gitignorePara nosso projeto, vamos criar uma Web API que será o coração da nossa aplicação:
dotnet new webapiAgora, vamos instalar o pacote NuGet Azure.AI.OpenAI que nos permitirá integrar o serviço Azure OpenAI:
dotnet add package Azure.AI.OpenAI --prerelease
Vamos criar um arquivo para configurar as IOptions do Azure OpenAI. Crie um novo arquivo e adicione o seguinte código:
namespace AzureOpenAiFunctionCalling.AzureOpenAi;

public class AzureOpenAiConfig
{
    public string Endpoint { get; set; } = default!;
    public string Key { get; set; } = default!;
    public string Model { get; set; } = default!;
}
Adicione as chaves necessárias no arquivo appsettings.json:
  "AzureOpenAi": {
    "Endpoint": "<your-endpoint>",
    "Key" : "<your-key>",
    "Model" : "<your-model>"
  }
Adicione a configuração no arquivo Program.cs para que nossa aplicação utilize as opções do Azure OpenAI:
builder.Services.Configure<AzureOpenAiConfig>(builder.Configuration.GetSection("AzureOpenAi"));Agora vamos criar um record para representar os assistentes na pasta Models:
namespace AzureOpenAiFunctionCalling.AzureOpenAi.Models;

public record Assistants(string Id, string Name, string Instructions);
Crie outro record para as requisições de criação de assistentes:
public record CreateAssistantRequest(string Name, string Description);Defina a interface do serviço que gerenciará os assistentes do Azure Open AI:
public interface IAssistantService
{
    Task<IList<Assistants>> ListAssistantAsync();
    Task<Assistants?> GetAssistantsByIdAsync(string id);
    Task<Assistants> CreateAssistantAsync(CreateAssistantRequest request);
}
Implemente o serviço que gerenciará os assistentes:
public partial class AssistantService(IOptions<AzureOpenAiConfig> config) : IAssistantService
{
    private readonly AzureOpenAiConfig _azureOpenAiConfig = config.Value;

    private AzureOpenAIClient GetClient()
    {
        return new AzureOpenAIClient(
            new Uri(_azureOpenAiConfig.Endpoint),
            new AzureKeyCredential(_azureOpenAiConfig.Key));
    }
}
#pragma warning disable OPENAI001
public partial class AssistantService
{
public async Task<IList<Assistants>> ListAssistantAsync()
{
var client = GetClient();
var assistantClient = client.GetAssistantClient();
AsyncPageableCollection<Assistant> assistants = assistantClient.GetAssistantsAsync();
var result = new List<Assistants>();
await foreach (Assistant assistant in assistants)
{
result.Add(new Assistants(
assistant.Id,
assistant.Name,
assistant.Instructions));
}
return result;
}
}
#pragma warning restore OPENAI001 // Type is for evaluation purposes only and is subject to change or removal in future updates. Suppress this diagnostic to proceed.#pragma warning disable OPENAI001
public partial class AssistantService
{
public async Task<Assistants?> GetAssistantsByIdAsync(string id)
{
try
{
var client = GetClient();
var assistantClient = client.GetAssistantClient();
var assistant = await assistantClient.GetAssistantAsync(id);
return new Assistants(
assistant.Value.Id,
assistant.Value.Name,
assistant.Value.Instructions);
}
catch (ClientResultException ex) when (ex.Status == 404)
{
return null;
}
}
}
#pragma warning restore OPENAI001 // Type is for evaluation purposes only and is subject to change or removal in future updates. Suppress this diagnostic to proceed.#pragma warning disable OPENAI001
public partial class AssistantService
{
public async Task<Assistants> CreateAssistantAsync(CreateAssistantRequest request)
{
var client = GetClient();
var assistantClient = client.GetAssistantClient();
var assistantOptions = new AssistantCreationOptions
{
Name = request.Name,
Instructions = request.Description,
ToolResources = new()
};
Assistant assistant = await assistantClient.CreateAssistantAsync(_azureOpenAiConfig.Model, assistantOptions);
return new Assistants(
assistant.Id,
assistant.Name,
assistant.Instructions);
}
}
#pragma warning restore OPENAI001 // Type is for evaluation purposes only and is subject to change or removal in future updates. Suppress this diagnostic to proceed.Observe que utilizamos partial classes para a implementação acima. Um arquivo para cada método!
Configure a injeção de dependência para o serviço criado anteriormente:
builder.Services.AddScoped<IAssistantService, AssistantService>();Configure os endpoints para os métodos implementados no Program.cs:
app.MapGet("/assistants", async (IAssistantService service) =>
Results.Ok(await service.ListAssistantAsync()))
.WithName("ListAssistants")
.WithOpenApi();
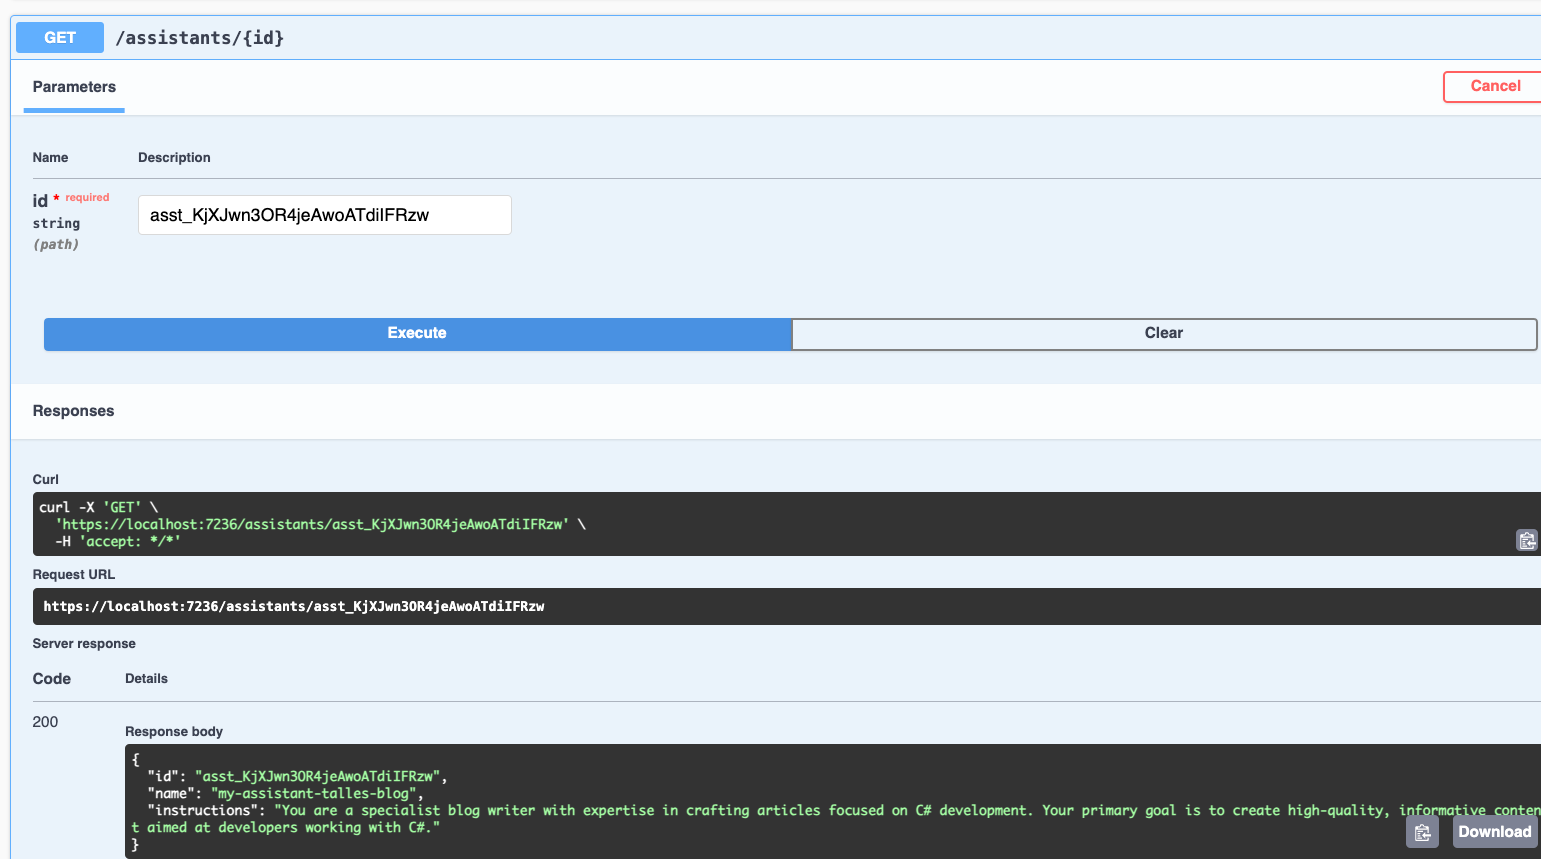
app.MapGet("/assistants/{id}", async (string id, IAssistantService service) =>
Results.Ok(await service.GetAssistantsByIdAsync(id)))
.WithName("GetAssistantsById")
.WithOpenApi();
app.MapPost("/assistants", async (CreateAssistantRequest request, IAssistantService service) =>
Results.Ok(await service.CreateAssistantAsync(request)))
.WithName("CreateAssistant")
.WithOpenApi();Aqui está um exemplo de chamada para o endpoint de criação de assistentes:

Aqui está um exemplo de chamada para o endpoint de listagem de assistentes por ID:
Vamos começar a implementação das threads!
Iniciaremos criando o record ThreadResponse.
namespace AzureOpenAiFunctionCalling.AzureOpenAi.Models;

public record ThreadResponse(string Id);
Adicione o método CreateThreadAsync na interface do serviço:
Task<ThreadResponse> CreateThreadAsync();#pragma warning disable OPENAI001
public partial class AssistantService
{
public async Task<ThreadResponse> CreateThreadAsync()
{
var client = GetClient();
var assistantClient = client.GetAssistantClient();
var thread = await assistantClient.CreateThreadAsync();
return new ThreadResponse(thread.Value.Id);
}
}
#pragma warning restore OPENAI001 // Type is for evaluation purposes only and is subject to change or removal in future updates. Suppress this diagnostic to proceed.Com o novo método pronto, podemos criar o novo endpoint para criação de threads.
app.MapPost("/threads", async (IAssistantService service) =>
        Results.Ok(await service.CreateThreadAsync()))
    .WithName("CreateThread")
    .WithOpenApi();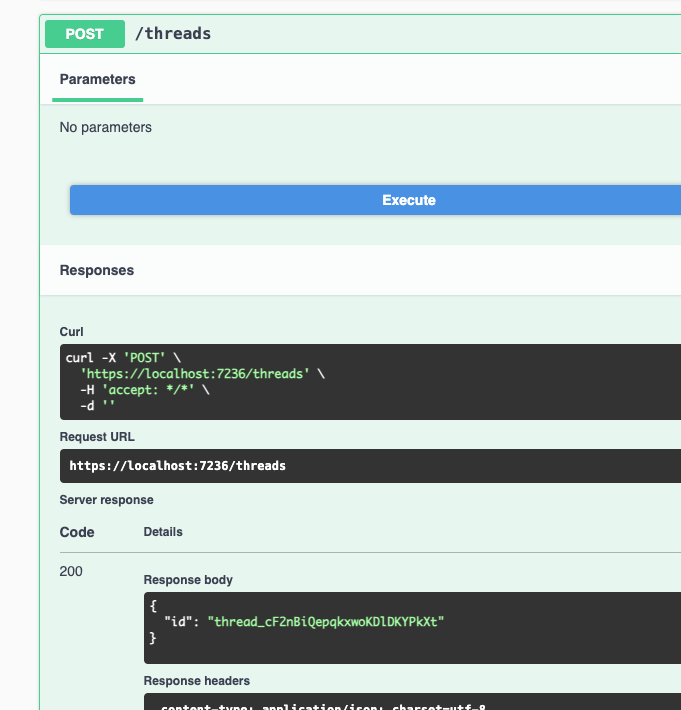
Agora vamos definir o métodoRunAsync que irá processar as mensagens:
Task<string> RunAsync(RunRequest request);#pragma warning disable OPENAI001
public partial class AssistantService
{
public async Task<string> RunAsync(RunRequest request)
{
var client = GetClient();
var assistantClient = client.GetAssistantClient();
var thread = (await assistantClient.GetThreadAsync(request.ThreadId)).Value;
var assistant = (await assistantClient.GetAssistantAsync(request.AssistantId)).Value;
await assistantClient.CreateMessageAsync(thread.Id, [MessageContent.FromText(request.Message)]);
ThreadRun threadRun = await assistantClient.CreateRunAsync(thread.Id, assistant.Id);
do
{
await Task.Delay(TimeSpan.FromMilliseconds(100));
threadRun = await assistantClient.GetRunAsync(thread.Id, threadRun.Id);
}
while (threadRun.Status == RunStatus.Queued || threadRun.Status == RunStatus.InProgress);
AsyncPageableCollection<ThreadMessage> messagePage = assistantClient.GetMessagesAsync(thread.Id, ListOrder.NewestFirst);
await using var enumerator = messagePage.GetAsyncEnumerator();
var messageItem = await enumerator.MoveNextAsync() ? enumerator.Current : null;
return messageItem?.Content.FirstOrDefault()?.Text ?? string.Empty;
}
}
#pragma warning restore OPENAI001 // Type is for evaluation purposes only and is subject to change or removal in future updates. Suppress this diagnostic to proceed.Vamos configurar o endpoint para o método RunAsync:
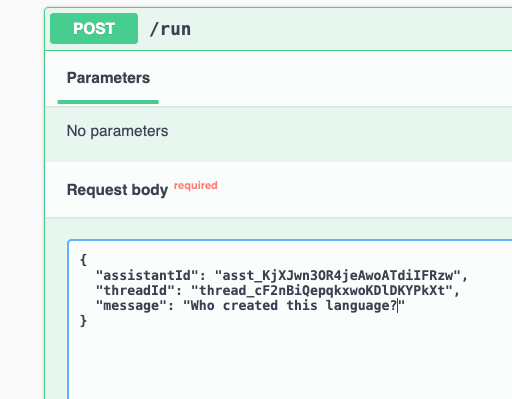
app.MapPost("/run", async (RunRequest request, IAssistantService azureOpenApiService) =>
        Results.Ok(await azureOpenApiService.RunAsync(request)))
    .WithName("Run")
    .WithOpenApi();
Aqui está um exemplo de chamada para o endpoint Run:
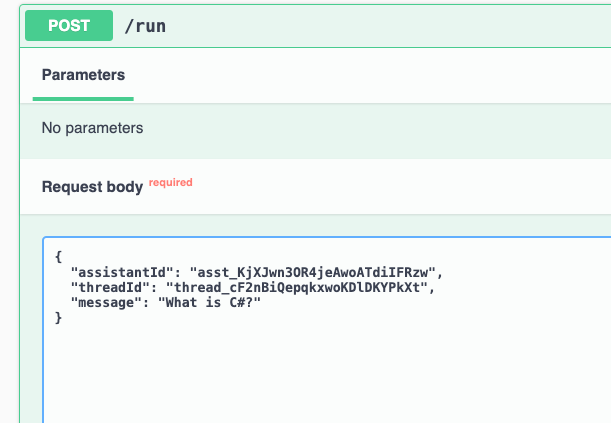
Observe que enviamos o threadId, o assistantId e a mensagem que deverá ser colocada na conversa.
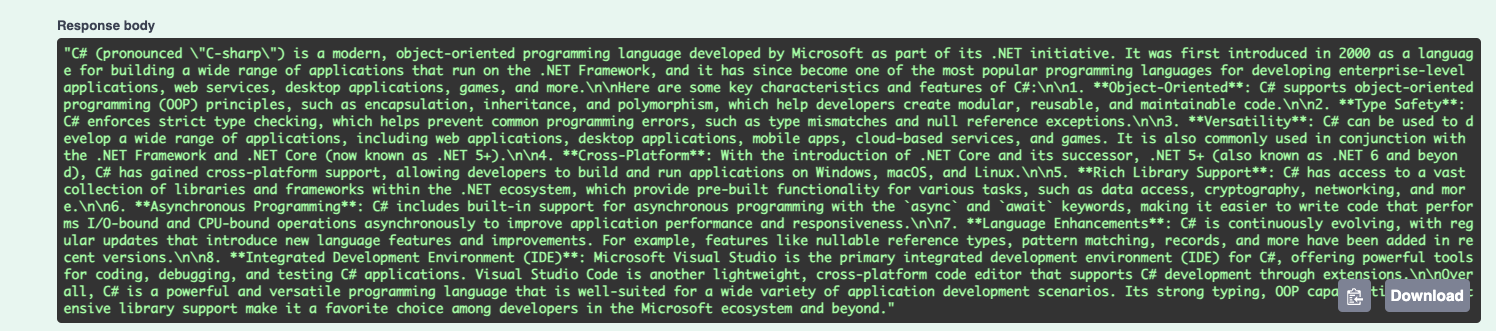
Temos a resposta do endpoint!
Vamos enviar outra mensagem:

Observe que para responder a segunda mensagem, ele utilizou o histórico de mensagens da thread.
Nosso assistant está funcionando perfeitamento. Agora é hora de adicionarmos algumas tools (function calling).
Vamos criar e implementar o serviço ChatCompletions:
public interface IChatCompletionsService
{
    string Complete(string systemMessage, string userMessage);
    string Complete(string userMessage);
}
using Azure;
using Azure.AI.OpenAI;
using Microsoft.Extensions.Options;
using OpenAI.Chat;
namespace AzureOpenAiFunctionCalling.AzureOpenAi.Services.ChatCompletions;
public class ChatCompletionsService(IOptions<AzureOpenAiConfig> config) : IChatCompletionsService
{
private AzureOpenAIClient GetClient()
{
return new AzureOpenAIClient(
new Uri(config.Value.Endpoint),
new AzureKeyCredential(config.Value.Key));
}
public string Complete(string userMessage, string systemMessage)
{
var client = GetClient();
var chatClient = client.GetChatClient(config.Value.Model);
var msgs = new List<ChatMessage>();
if (!string.IsNullOrWhiteSpace(systemMessage))
{
msgs.Add(new SystemChatMessage(systemMessage));
}
msgs.Add(new UserChatMessage(userMessage));
var completion = chatClient.CompleteChat(msgs.ToArray());
var result = completion.Value.Content[0].Text;
return result;
}
public string Complete(string userMessage)
{
return Complete(userMessage, string.Empty);
}
}Iremos, agora, definir a interface ITool. Ela será utilizado por todas as ferramentas que serão utilizadas via function calling.
using OpenAI.Assistants;

namespace AzureOpenAiFunctionCalling.AzureOpenAi.Tools;

public interface ITool
{
    public static abstract string Name { get; }

    public static abstract FunctionToolDefinition Definition { get; }
}
Vamos implementar a primeira tool, que será especializada em escrever artigos sobre um tema qualquer (parâmetro) em um determinado número de linhas (outo parâmetro):
using System.Text.Json;
using AzureOpenAiFunctionCalling.AzureOpenAi.Services.ChatCompletions;
using OpenAI.Assistants;

namespace AzureOpenAiFunctionCalling.AzureOpenAi.Tools;

public class BlogArticleWriter : ITool
{
    private const string MessageTemplate = """
          Create a article about '{generalIdea}' in {numberOfWords} words.
         Use the '{title}' as title.
         Outputs only the article

         -----

         Use the following schema:

         <title>

         <content>
         """;

    public static string Name => nameof(BlogArticleWriter);

    public static FunctionToolDefinition Definition => new(
        name: Name,
        description: "Write article for a personal tech blog",
        parameters: BinaryData.FromObjectAsJson(
            new
            {
                Type = "object",
                Properties = new
                {
                    Title = new
                    {
                        Type = "string",
                        Description = "The title of the article",
                    },
                    GeneralIdea = new
                    {
                        Type = "string",
                        Description = "The idea of the article",
                    },
                    NumberOfLines = new
                    {
                        Type = "integer",
                        Description = "The number of lines",
                    },
                },
                Required = new[] { "Title", "GeneralIdea", "NumberOfLines" },
            },
            new JsonSerializerOptions() { PropertyNamingPolicy = JsonNamingPolicy.CamelCase }));

    public string Execute(
        ILogger logger,
        IChatCompletionsService chatCompletionsService,
        string title,
        string generalIdea,
        int numberOfLines)
    {
        var formattedMsg = MessageTemplate
            .Replace("{generalIdea}", generalIdea)
            .Replace("{title}", title)
            .Replace("{numberOfLines}", numberOfLines.ToString());

        var result = chatCompletionsService.Complete(formattedMsg);

        logger.LogInformation($"Article with title '{title}' and general idea '{generalIdea}' was created");

        return result;
    }
}
E a tool que enviar emails:
using System.Text.Json;
using OpenAI.Assistants;

namespace AzureOpenAiFunctionCalling.AzureOpenAi.Tools;

public class EmailTool : ITool
{
    public static string Name => nameof(EmailTool);

    public static FunctionToolDefinition Definition => new(
        name: Name,
        description: "Send emails",
        parameters: BinaryData.FromObjectAsJson(
            new
            {
                Type = "object",
                Properties = new
                {
                    ReceiverEmail = new
                    {
                        Type = "string",
                        Description = "E-mail of the person who will receive the email",
                    },
                    Subject = new
                    {
                        Type = "string",
                        Description = "E-mail subject",
                    },
                    Message = new
                    {
                        Type = "string",
                        Description = "Email message",
                    },
                },
                Required = new[] { "ReceiverEmail", "Subject", "Message" },
            },
            new JsonSerializerOptions() { PropertyNamingPolicy = JsonNamingPolicy.CamelCase }));

    public string Execute(ILogger logger, string receiverEmail, string subject, string message)
    {
        logger.LogInformation($"Email sent to '{receiverEmail}' with subject '{subject}' and message '{message}'");

        return "Email sent successfully";
    }
}
Precisamos atualizar a criação do assistente para incluir as tools. Dessa forma, os assistentes criados irão saber que ele pode utilizá-las quando preciso.
  var assistantOptions = new AssistantCreationOptions
        {
            Name = request.Name,
            Instructions = request.Description,
            ToolResources = new(),
            Tools =
            {
                EmailTool.Definition,
                BlogArticleWriter.Definition
            },
        };
Vamos implementar o serviço que chamará as tools definidas. Ele será responsável por decidir qual tool será chamada via function calling.
public interface IToolHandler
{
    ToolOutput Handle(RequiredAction requiredAction);
}
using System.Text.Json;
using AzureOpenAiFunctionCalling.AzureOpenAi.Services.ChatCompletions;
using AzureOpenAiFunctionCalling.AzureOpenAi.Tools;
using OpenAI.Assistants;
namespace AzureOpenAiFunctionCalling.AzureOpenAi.Services.ToolHandler;
public class ToolHandler(ILogger<ToolHandler> logger, IChatCompletionsService chatCompletionsService) : IToolHandler
{
public ToolOutput Handle(RequiredAction requiredAction)
{
using JsonDocument argumentsJson = JsonDocument.Parse(requiredAction.FunctionArguments);
if (requiredAction.FunctionName == EmailTool.Name)
{
return HandlerEmailTool(requiredAction, argumentsJson);
}
if (requiredAction.FunctionName == BlogArticleWriter.Name)
{
return HandlerBlogArticleWriterTool(requiredAction, argumentsJson);
}
return null!;
}
private ToolOutput HandlerBlogArticleWriterTool(RequiredAction requiredAction, JsonDocument argumentsJson)
{
string title = argumentsJson.RootElement.GetProperty("title").GetString()!;
string generalIdea = argumentsJson.RootElement.GetProperty("generalIdea").GetString()!;
int numberOfLines = argumentsJson.RootElement.GetProperty("numberOfLines").GetInt32()!;
var result = new BlogArticleWriter().Execute(
logger,
chatCompletionsService,
title,
generalIdea,
numberOfLines);
return new ToolOutput(requiredAction.ToolCallId, result);
}
private ToolOutput HandlerEmailTool(RequiredAction requiredAction, JsonDocument argumentsJson)
{
string receiverEmail = argumentsJson.RootElement.GetProperty("receiverEmail").GetString()!;
string subject = argumentsJson.RootElement.GetProperty("subject").GetString()!;
string message = argumentsJson.RootElement.GetProperty("message").GetString()!;
var result = new EmailTool().Execute(
logger,
receiverEmail,
subject,
message);
return new ToolOutput(requiredAction.ToolCallId, result);
}
}Precisamos atualizar o loop para fazer as chamadas das tools (quando necessário):
do
{
await Task.Delay(TimeSpan.FromMilliseconds(100));
threadRun = await assistantClient.GetRunAsync(thread.Id, threadRun.Id);
if (threadRun.Status == RunStatus.RequiresAction)
{
List<ToolOutput> toolOutputs = new();
foreach (var requiredAction in threadRun.RequiredActions)
{
var result = toolHandler.Handle(requiredAction);
toolOutputs.Add(result);
}
threadRun = await assistantClient.SubmitToolOutputsToRunAsync(threadRun, toolOutputs);
}
}
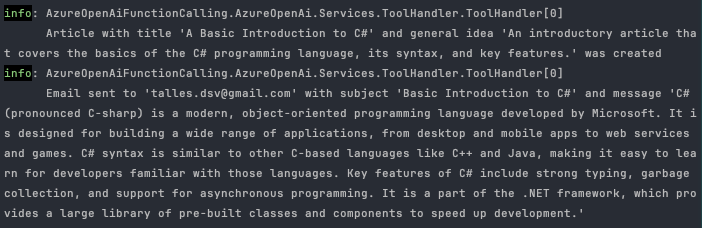
while (threadRun.Status == RunStatus.Queued || threadRun.Status == RunStatus.InProgress);Com isso pronto, podemos criar um novo prompt. Nesse exemplo, irei pedir para o assistente criar um artigo sobre C# e depois enviar para o meu e-mail. Dessa forma, o assistente deverá utilizar as duas tools criadas anteriormente.

"Create an article about C# (basic introduction to the language) in 100 words. After that, email talles.dsv@gmail.com with the article as message"Temos o resultado:

Vendo os logs, podemos ver que as duas tools foram utilizadas sequencialmente!
E é isso pessoal! Teremos muito mais para falar sobre essa ferramenta incrível nos posts futuros.
Você já pode baixar o projeto e não esquece de me seguir no LinkedIn!
Até a próxima, abraços!
 TallesValiatti